📓 Git Branching
So far we've learned what Git and GitHub are, how to set up a project, track changes, push code to GitHub, and clone projects back down from GitHub into a local Git repository.
In this lesson we'll dive deeper into Git by exploring something called branching. In this lesson, we'll learn more about what it is, how it works, what benefits it offers, and how to create and maintain branches in our own projects.
To do this, we'll walk through creating an example project in the next two lessons. Together, we'll create and merge branches in this example project. Then, in an upcoming exercise you'll have the opportunity to work with branches on your own project with a partner.
Overview
In Git, branching is the act of creating multiple copies of similar code in the same repository. There are many reasons developers do this. Here are a few of the most common:
Multiple branches allow a team of developers to work together without "stepping on each others' feet", so to speak. If a team was all working on the same files at the same time, things could get messy very quickly. Branches allow each developer their own copy of the project to work on. When part of the project is done, the team can merge multiple branches together into a completed final product. We'll get plenty of practice with this when we work on group projects during team week.
Branching also allows us to experiment with changes without risking our final product. We can use branching to create a copy of our code separate from our final version to experiment with new features and code. If this new code causes any bugs, we can rest assured knowing our original code is still safe!
Branching allows us to pursue multiple options at once. Not sure which approach to a problem is preferable? With branching, you could always create multiple copies of your project, try implementing different code in each, and see which result is preferable.
Main Branch
You may be surprised to learn that you've been interacting with branches since the beginning of the course! At this point in the curriculum, you've most likely pushed several projects to GitHub already. Your current GitHub repositories should look something like this:

Notice the dropdown menu on the left side labeled Branch:

If we click this dropdown we see it contains one entry: main.
When you learned how to push a project to a remote GitHub repo, you pushed your local Git repositories to online GitHub repositories using a command like this:
$ git push al main
(The initials al in the command above are just an example; your own initials would be placed here.)
The main portion of this command instructs Git to push the current main copy of your local repository to the remote repository under the nickname al.
But what does main mean? Well, projects tracked in Git and GitHub may have multiple branches. The term main specifies that code should be pushed to the main branch on GitHub. Remember, we saw there was a branch named main in the dropdown menu on GitHub.
A branch is just another copy or version of the project's main code. Both Git and GitHub repositories may have multiple branches at once. There is always at least one branch in a project: the main branch.
Main is the name of the default branch. If you don't create or navigate between branches in your project, you will have one branch named main, and you will be located in it by default. When you have multiple branches in a project, the main branch is like the "final draft".
Branches that are not main are often referred to as feature branches, because they allow developers to experiment with new features before integrating them into the "final draft" main branch.
Example Project
Let's walk through a basic example of branching together. We'll craft a small website. Then, we'll create multiple branches to experiment with different CSS styles. We'll compare the styles, choose which we like best, and integrate the favored styles into our "final draft" (that is, our main branch). You and your partner should begin following along at this time.
Project Setup
First, we'll set up our basic site. Everything in this section should be review from previous lessons.
Project Directory
First, let's create a new project directory on our Desktop. Remember, whenever we start a new project we must create a new directory for it to reside in. First, we'll navigate to our Desktop:
$ cd Desktop
Then, we'll create a new directory called branching-test-project:
$ mkdir branching-test-project
If we run $ ls we can see our new branching-test-project directory. Next, use the $ cd command to navigate to the new project folder:
$ cd branching-test-project
Remember, if you're ever unsure of your location in the command line you can run the $ pwd command.
Git Initialization
Next, we'll initialize our Git repository:
$ git init
HTML File
Next, let's create an HTML file for our website's code:
$ touch branching-website.html
We'll open our project directory in VS Code:
$ code .
And add the following code to our branching-website.html file:
<!DOCTYPE html>
<html lang="en-US">
<head>
<title>Branching Practice Site</title>
</head>
<body>
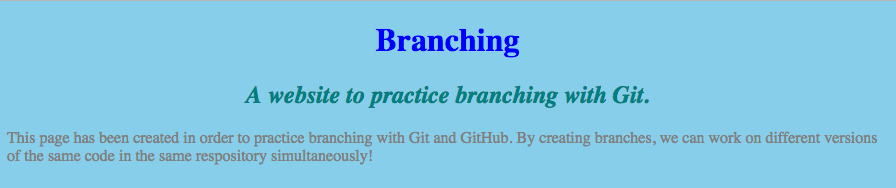
<h1>Branching</h1>
<h2>A website to practice branching with Git.</h2>
<p>This page has been created in order to practice branching with Git and GitHub. By creating branches, we can work on different versions of the same code in the same repository simultaneously!</p>
</body>
</html>
Committing Changes
Once this code is in place, we can make our first commit. First, we'll run $ git status to see there are new, uncommitted changes in our project. It should show that branching-website.html hasn't been committed yet. Untracked changes show up in red.
Then, we can run $ git add to add our new branching-website.html file to Git so it will track this file's changes:
$ git add branching-website.html
We can run $ git status again to see that our file is now being tracked, but has not yet been committed. Tracked changes show up in green.
Let's save our new HTML to the permanent history of the project by committing it. You'll use the $ git commit command to do this:
$ git commit -m "Add initial HTML file with explanation of branching practice site."
If we run $ git log we can see a new commit has been added to the history of our project:
$ git log
commit eb1774eee69d3e8fa1d74790dc9c64d70d1e9ec2
Author: Ada Lovelace and Enrique de la Fuente <ada@>
Date:   Mon Oct 10 11:49:54 2016 -0700

    Add initial HTML file with explanation of branching practice site.
When you run $ git log, the person who committed will be listed as the author.
Updating the Default Branch to Main
If needed, update the default branch from master to main:
git branch -M main
Adding Styles with CSS
Great! Now, earlier today you learned about CSS. Before we begin branching, let's create a basic CSS stylesheet for our example project. We'll make a folder called css in our existing project directory:
$ mkdir css
Then, we'll create a file called styles.css within our new css directory:
$ touch css/styles.css
Note that we don't have to cd into the css directory — we can just specify the directory where we want the file to be created!
Our project structure should look like this:

Note that the image above looks a little different because it uses a different text editor.
Next, let's tell our HTML document to use this new file for its CSS. We will include a link to the new CSS file in the <head> tags of our branching-website.html file, like this:
<!DOCTYPE html>
<html lang="en-US">
<head>
  <link href="css/styles.css" rel="stylesheet" type="text/css">
  <title>Branching Practice Site</title>
</head>
<body>
  <h1>Branching</h1>
  <h2>A website to practice branching with Git.</h2>
  <p>This page has been created in order to practice branching with Git and GitHub. By creating branches, we can work on different versions of the same code in the same repository simultaneously!</p>
</body>
</html>
Let's add these new changes to our Git repository:
$ git add .
And commit them to the history of our project:
$ git commit -m "Create stylesheet, link in head of website."
Next, we'll add a basic CSS rule to our stylesheet:
h1 {
  color: blue;
}
If we open the branching-website.html file in our browser, we should see that the text in the <h1> tags is blue:

Let's add and commit this new CSS rule to our project:
$ git add css/styles.css
$ git commit -m "Add CSS rule to make H1 headings blue."
If we run $ git log, we now have 3 commits:
$ git log
commit 982b0f21463be34d909c45dd67778d6ffe3d7668
Author: Ada Lovelace and Enrique de la Fuente <enrique@>
Date:   Mon Oct 10 12:06:35 2016 -0700

    Add CSS rule to make H1 headings blue.

commit 8e36f8bfd58643487565c5a4fbcb5250fed0808b
Author: Ada Lovelace and Enrique de la Fuente <ada@>
Date:   Mon Oct 10 12:04:27 2016 -0700

    Create stylesheet, link in head of website.

commit eb1774eee69d3e8fa1d74790dc9c64d70d1e9ec2
Author: Ada Lovelace and Enrique de la Fuente <ada@>
Date:   Mon Oct 10 11:49:54 2016 -0700

    Add initial HTML file with explanation of branching practice site.
Now that our basic website is set up, we can use it to learn about branching in the next section. Nice work!
Viewing a Project's Branches
Everything we've done thus far should be review. Now, let's explore the new concept at hand: Branching. First we'll run the following command:
$ git branch
The $ git branch command displays what branches are currently in our project. It also denotes which branch we're currently viewing with an asterisk *. After we execute this command, we should see this:
* main
This informs us that there is only one branch: main. And, we know we're currently located in that branch because there is an asterisk next to it. Remember, main is the default branch. If we do not create any branches, or move between any branches, we will be on main.
Creating a New Branch
Let's pretend we're unsure how to style our site. We want to test a couple different stylistic approaches, and see which looks best. To do this, we'll create several versions of our project with branches. We'll implement different styles in each branch.
We can create a new branch by running the $ git branch command and including the name of the new branch after it, like this:
$ git branch blue_theme
This creates a new branch named blue_theme. Branch names should be short and meaningful, and describe the reason for the branch. In our case, this branch will contain styles that use the color blue throughout.
Navigating Between Branches
If we run $ git branch again, we can see our project now contains two branches:
$ git branch

  blue_theme
* main
Notice the asterisk is still next to main. We created a new blue_theme branch, but we're still located on main. We can switch branches like this:
$ git checkout blue_theme
The $ git checkout command navigates to the specified branch. We can run $ git branch again to confirm we've successfully entered the blue_theme branch:
$ git branch

* blue_theme
  main
The asterisk is now next to blue_theme, so we know we've successfully navigated to that branch. Now, let's look at our project in VS Code. Despite being located in our new branch, everything should look the exact same.
When you create a branch, the new branch is "branched off" from the branch you are located in when the command to create a new branch is executed. This means the new branch will contain all code and commits from the branch it was branched off from. In our case, since we were located in main when we created blue_theme , blue_theme contains all code and commits that main contained at the time of the new branch's creation.
We can confirm this by running $ git log. We should see our new branch contains the same commits we made on main:
$ git log

commit 982b0f21463be34d909c45dd67778d6ffe3d7668
Author: Ada Lovelace and Enrique de la Fuente <enrique@>
Date:   Mon Oct 10 12:06:35 2016 -0700

    Add CSS rule to make H1 headings blue.

commit 8e36f8bfd58643487565c5a4fbcb5250fed0808b
Author: Ada Lovelace and Enrique de la Fuente <ada@>
Date:   Mon Oct 10 12:04:27 2016 -0700

    Create stylesheet, link in head of website.

commit eb1774eee69d3e8fa1d74790dc9c64d70d1e9ec2
Author: Ada Lovelace and Enrique de la Fuente <ada@>
Date:   Mon Oct 10 11:49:54 2016 -0700

    Add initial HTML file with explanation of branching practice site.
Working on a Branch
We now have a separate, isolated version of our project to experiment with. We can safely test code in blue_theme without risking the integrity of code in main. We can change, add, and commit whatever we'd like in blue_theme and main will remain completely unaffected. Let's add more CSS to the styles.css stylesheet:
h1 {
  color: blue;
  text-align: center;
}

h2 {
  font-style: italic;
  text-align: center;
  color: teal;
}

p {
  color: gray;
}

body {
  background-color: skyblue;
}
If we refresh our page in the browser, we can see these new styles:
As always, we'll add these changes to our Git repository and commit them:
$ git add css/styles.css
$ git commit -m "Add styles to h1, h2, p, and body to fit blue theme."
Separation of Commits Between Branches
Let's run $ git log again to see a summary of our commits:
$ git log

commit 268363ae7b81a7ee91540d93f82e3f9285c575dd
Author: Ada Lovelace and Enrique de la Fuente <enrique@>
Date:   Mon Oct 10 12:24:38 2016 -0700

    Add styles to h1, h2, p, and body to fit blue theme.

commit 982b0f21463be34d909c45dd67778d6ffe3d7668
Author: Ada Lovelace and Enrique de la Fuente <enrique@>
Date:   Mon Oct 10 12:06:35 2016 -0700

    Add CSS rule to make H1 headings blue.

commit 8e36f8bfd58643487565c5a4fbcb5250fed0808b
Author: Ada Lovelace and Enrique de la Fuente <ada@>
Date:   Mon Oct 10 12:04:27 2016 -0700

    Create stylesheet, link in head of website.

commit eb1774eee69d3e8fa1d74790dc9c64d70d1e9ec2
Author: Ada Lovelace and Enrique de la Fuente <ada@>
Date:   Mon Oct 10 11:49:54 2016 -0700

    Add initial HTML file with explanation of branching practice site.
The blue_theme branch now contains the commits it inherited from main, and the new commit we've just made. Before we continue, let's return to our main branch for a moment using the $ git checkout command:
$ git checkout main
As always, we can double-check we're on main by running $ git branch and confirming that main has an asterisk next to it:
$ git branch

  blue_theme
* main
Great. Now, let's look at the commits on our main branch again:
$ git log

commit 982b0f21463be34d909c45dd67778d6ffe3d7668
Author: Ada Lovelace and Enrique de la Fuente <enrique@>
Date:   Mon Oct 10 12:06:35 2016 -0700

    Add CSS rule to make H1 headings blue.

commit 8e36f8bfd58643487565c5a4fbcb5250fed0808b
Author: Ada Lovelace and Enrique de la Fuente <ada@>
Date:   Mon Oct 10 12:04:27 2016 -0700

    Create stylesheet, link in head of website.

commit eb1774eee69d3e8fa1d74790dc9c64d70d1e9ec2
Author: Ada Lovelace and Enrique de la Fuente <ada@>
Date:   Mon Oct 10 11:49:54 2016 -0700

    Add initial HTML file with explanation of branching practice site.
Notice that the new commit we just made on blue_theme is not present in main! Our blue_theme branch's most recent commit reads "Add styles to h1, h2, p, and body to fit blue theme." Whereas main's most recent commit reads "Add CSS rule to make H1 headings blue." And if we refresh our page in the browser again, we can see our blue styles are no longer present:
Also, if you view the styles.css stylesheet in Visual Studio Code, you'll notice that the CSS rules we just added are gone. Don't worry; this is entirely normal. Because we switched branches, the version of the project we're seeing in VS Code is different. The main branch does not have the same CSS rules as the blue_theme branch.
Remember, when we create a branch the new branch will inherit all commits from the branch it is branched off from. That is, the branch we are located in when we create the new branch. However, when we make new commits on our new branch, they remain on that branch. The organization of our current commits between branches look something like this:

We can see our first three commits on main. When we branched off of main to create blue_theme, it inherited all of main's commits. However, when we made subsequent commits in blue_theme they remained exclusive to blue_theme and were not shared with main.
Working with Multiple Branches
Let's create another branch with a different set of CSS styles for our site. Remember, you may branch off from any existing branch. The new branch will contain all code and commits from whatever branch you were located within when the new branch was created.
Creating a New Branch
Let's branch from main again. We'll run $ git branch and confirm we're located in main:
$ git branch

  blue_theme
* main
Then, we'll create another new branch named red_theme, like this:
$ git branch red_theme
We'll run $ git branch again to confirm our new branch has been created:
$ git branch

  blue_theme
* main
  red_theme
Navigating Between Branches
Next, we'll switch to our new red_theme branch using the $ git checkout command:
$ git checkout red_theme

Switched to branch 'red_theme'
We can run $ git branch to confirm we've successfully navigated into the red_theme branch:
$ git branch

  blue_theme
  main
* red_theme
And, if we run $ git log we can see red_theme has inherited all commits from main, as expected:
$ git log

commit 982b0f21463be34d909c45dd67778d6ffe3d7668
Author: Ada Lovelace and Enrique de la Fuente <enrique@>
Date:   Mon Oct 10 12:06:35 2016 -0700

    Add CSS rule to make H1 headings blue.

commit 8e36f8bfd58643487565c5a4fbcb5250fed0808b
Author: Ada Lovelace and Enrique de la Fuente <ada@>
Date:   Mon Oct 10 12:04:27 2016 -0700

    Create stylesheet, link in head of website.

commit eb1774eee69d3e8fa1d74790dc9c64d70d1e9ec2
Author: Ada Lovelace and Enrique de la Fuente <ada@>
Date:   Mon Oct 10 11:49:54 2016 -0700

    Add initial HTML file with explanation of branching practice site.
Working on a Branch
Our styles.css file should look like this:
h1 {
  color: blue;
}
Again, notice that it does not contain the CSS we just committed in the blue_theme branch. The new red_theme branch was branched off of main. Therefore, it contains all of main's commits and code. It does not contain the code we committed on the blue_theme branch, only the main branch. Let's add styles to this branch's version of the styles.css file now:
h1 {
  color: darkred;
  text-align: center;
}

h2 {
  font-style: italic;
  text-align: center;
  color: red;
}

p {
  color: crimson;
}

body {
  background-color: salmon;
}
If we refresh our page in the browser, we can see our new CSS at work:

We'll add these changes to our Git repository, and commit:
$ git add css/styles.css
$ git commit -m "Add styles to h1, h2, p, and body to fit red theme."
As always, we can run $ git log to see a summary of our commits:
$ git log

commit 5f2d9510cdc76736c7c5cf7e5d56264cd405fcd1
Author: Ada Lovelace and Enrique de la Fuente <enrique@>
Date:   Mon Oct 10 12:51:11 2016 -0700

    Add styles to h1, h2, p, and body to fit red theme.

commit 982b0f21463be34d909c45dd67778d6ffe3d7668
Author: Ada Lovelace and Enrique de la Fuente <enrique@>
Date:   Mon Oct 10 12:06:35 2016 -0700

    Add CSS rule to make H1 headings blue.

commit 8e36f8bfd58643487565c5a4fbcb5250fed0808b
Author: Ada Lovelace and Enrique de la Fuente <ada@>
Date:   Mon Oct 10 12:04:27 2016 -0700

    Create stylesheet, link in head of website.

commit eb1774eee69d3e8fa1d74790dc9c64d70d1e9ec2
Author: Ada Lovelace and Enrique de la Fuente <ada@>
Date:   Mon Oct 10 11:49:54 2016 -0700

    Add initial HTML file with explanation of branching practice site.
Perfect. We now have the commits that came along with the new branch when we branched from main, and the new commit we've just made on the red_theme branch. Our organization of commits between branches currently looks like this:

Now, let's say we want to improve the styles in red_theme even further by changing the site's text. We'll include the following additional CSS rules in styles.css:
h1 {
  color: darkred;
}

h2 {
  font-style: italic;
  color: red;
}

p {
  color: crimson;
}

body {
  background-color: salmon;
  font-family: sans-serif;
  text-align: center;
}
Here, we denote that everything located in the <body> tags should have sans-serif style font that is center-aligned. Because we're now styling everything in <body> tags we can remove text-align: center; from the existing h1 and h2 CSS rules. The <h1> and <h2> tags exist within the <body> tags, so this rule will automatically apply to them too. We can save our changes and refresh the site to see our new styles:

Again, we'll add these changes to our Git repository:
$ git add css/styles.css
And commit them with a descriptive message:
$ git commit -m "Make all font sans-serif style."
Let's run $ git log. We can see that in addition to the 3 commits inherited from main, the red_theme branch also has 2 of its own commits:
$ git log

commit d5bae6406669988e154608ce990e08fed51e9cb3
Author: Ada Lovelace and Enrique de la Fuente <enrique@>
Date:   Mon Oct 10 13:00:42 2016 -0700

    Make all font sans-serif style.

commit 5f2d9510cdc76736c7c5cf7e5d56264cd405fcd1
Author: Ada Lovelace and Enrique de la Fuente <enrique@>
Date:   Mon Oct 10 12:51:11 2016 -0700

    Add styles to h1, h2, p, and body to fit red theme.

commit 982b0f21463be34d909c45dd67778d6ffe3d7668
Author: Ada Lovelace and Enrique de la Fuente <enrique@>
Date:   Mon Oct 10 12:06:35 2016 -0700

    Add CSS rule to make H1 headings blue.

commit 8e36f8bfd58643487565c5a4fbcb5250fed0808b
Author: Ada Lovelace and Enrique de la Fuente <ada@>
Date:   Mon Oct 10 12:04:27 2016 -0700

    Create stylesheet, link in head of website.
The commits across all branches of the project currently look like this:

Benefits of Branching
Are you beginning to see how branching can be beneficial? It allows us to experiment with code and ensure it works correctly before saving it to our "final draft" main branch. When developers integrate new features into projects, they commonly do so in a branch. This allows them to make a copy of the entire project, experiment with new code, and confirm it does what it is supposed to before saving it into the final version.
This prevents bugs or issues from affecting the project. If the new code a developer adds breaks anything, it won't cause issues on main, only on that isolated branch. This allows developers room to iron out any issues with code before integrating it into the final version of the project.
When code is fine-tuned and tested in the branch, and we know it works, we can add it into main. This process is called merging, and we'll explore it in detail in the next lesson as we continue to work with this example project.