📓 Pull Requests with Branches
In this lesson, we'll practice making pull requests with branches. This is a common workflow in the industry. In this workflow, a developer pulls down the latest code from the main branch and creates a new branch. When a feature is completed, the new branch is committed and pushed to GitHub. Then the developer makes a pull request so the code can be merged into the main branch via GitHub's UI.
We've already learned one way to merge our code into the main branch in Practicing the Git Workflow. While it's important to be fluent in this workflow, it doesn't allow for any oversight of the process. All of the merging happens locally.
In the case of group projects, the entire team should be able to comment on and merge pull requests. In order to do so, everyone must be a collaborator on the project. See the Git with Collaborators Setup lesson for instructions on adding collaborators.
Pull Requests with Branches
Once again, we'll create a very simple project with a README to walk through the process of making pull requests. After all, the goal isn't to code here — it's to practice a new git workflow.
Start by creating a repository in GitHub called pr-practice. Clone that down to your local machine and add a README with the following text:
Next, commit this code and push it back to the main branch. We need to have some starter code before we practice our new git workflow.
Next, create a branch called new-feature locally:
$ git checkout -b new-feature
Now let's update our README (in the local new-feature branch, not in the GitHub UI):
This code needs some updates. Fork it and make a pull request!

New feature added!
Next, we need to save and commit our code. Finally, we'll push our new-feature branch to GitHub. As of now, it only exists locally.
$ git push origin new-feature
Now our new-feature branch exists both locally and remotely, but it still hasn't been merged into the main branch yet.
At this point, we're ready to make our first pull request.
Creating a Pull Request
At this point, we can go to the repository in GitHub and click on the Branches tab. This will show all of the branches you've created as well as all of the active branches in the project.
![We can see all the active branches in our project.] (https://learnhowtoprogram.s3.us-west-2.amazonaws.com/Intermediate+JavaScript/making-pr-requests/click-on-pr-request-button.png)
In the image above, we can also see that our branches have a button on the right side of the screen that reads New Pull Request. That's exactly what we want. Click on this button to open a new pull request.
Note: If you don't see the branch you've been working on in GitHub, that probably means it only exists locally. Make sure to commit and push the branch and then refresh GitHub.
Once we click on the New Pull Request button, we'll be taken to a screen that looks like this:
![Image shows screen with option to add comment and create pull request.] (https://learnhowtoprogram.s3.us-west-2.amazonaws.com/Intermediate+JavaScript/making-pr-requests/add-a-comment-to-pr.png)
There are several important things to note about this screen.
First, at the top, we see two dropdowns. The one on the left reads base: main. The one on the right reads compare: _new_feature. Then, just to the right of that, we see a green message with a checkbox that says Able to merge.
Base is the branch we want to merge our new feature into. It will often be the main branch but not always. For instance, if we also had a development branch, we might want to target that branch with our PR instead.
Compare is the branch that includes the code we want to merge. In this case, it's the new-feature branch. However, we could also change it to be another branch instead. Why is it compare instead of merge? Well, just because we are creating a PR doesn't mean the code will eventually be merged. It is just a request. We are asking someone else to review the code and compare it. Based on that, the reviewers will determine whether the PR should be merged, if it needs more changes, or if it should be rejected outright.
Next, we have an Able to merge message. This is important. This verifies that our PR, if it is approved, can be merged without any conflicts. We can still make a PR even if it will cause merge conflicts but in general we want to avoid that if possible. Merge conflicts are often a sign that developers haven't been communicating about the code they are working on, resulting in two sets of code that has conflicts. We will work through an example of a PR with merge conflicts after we are finished creating and merging this PR.
Next, we need to give our PR a title and add a comment. It's important to communicate clearly and concisely. While it's technically optional to add a comment to a PR, doing so (and having a clear title) makes it easier for reviewers to see what your PR is supposed to do. In an actual job, you should always strive to have good communication. Your senior devs will not be happy if they have to review poor PRs that create more work for them.
Once this is done, we can click on Create pull request. There are actually two options here. We can click on the dropdown attached to the button to have an option to Create Draft Pull Request. This simply means that the PR can't be merged until you mark it ready for review. Generally, we'll be making PRs only when the code is ready to merge. However, a draft pull request can be helpful because it allows others to see the new code — and comment on it — while it's still in progress.
Click on Create pull request and we're done making the request.
Approving a Pull Request
After we create the pull request, GitHub will display the page with the pull request. We can also navigate to our new PR, or any other PR in the repository, by clicking on the Pull requests tab in the repository.
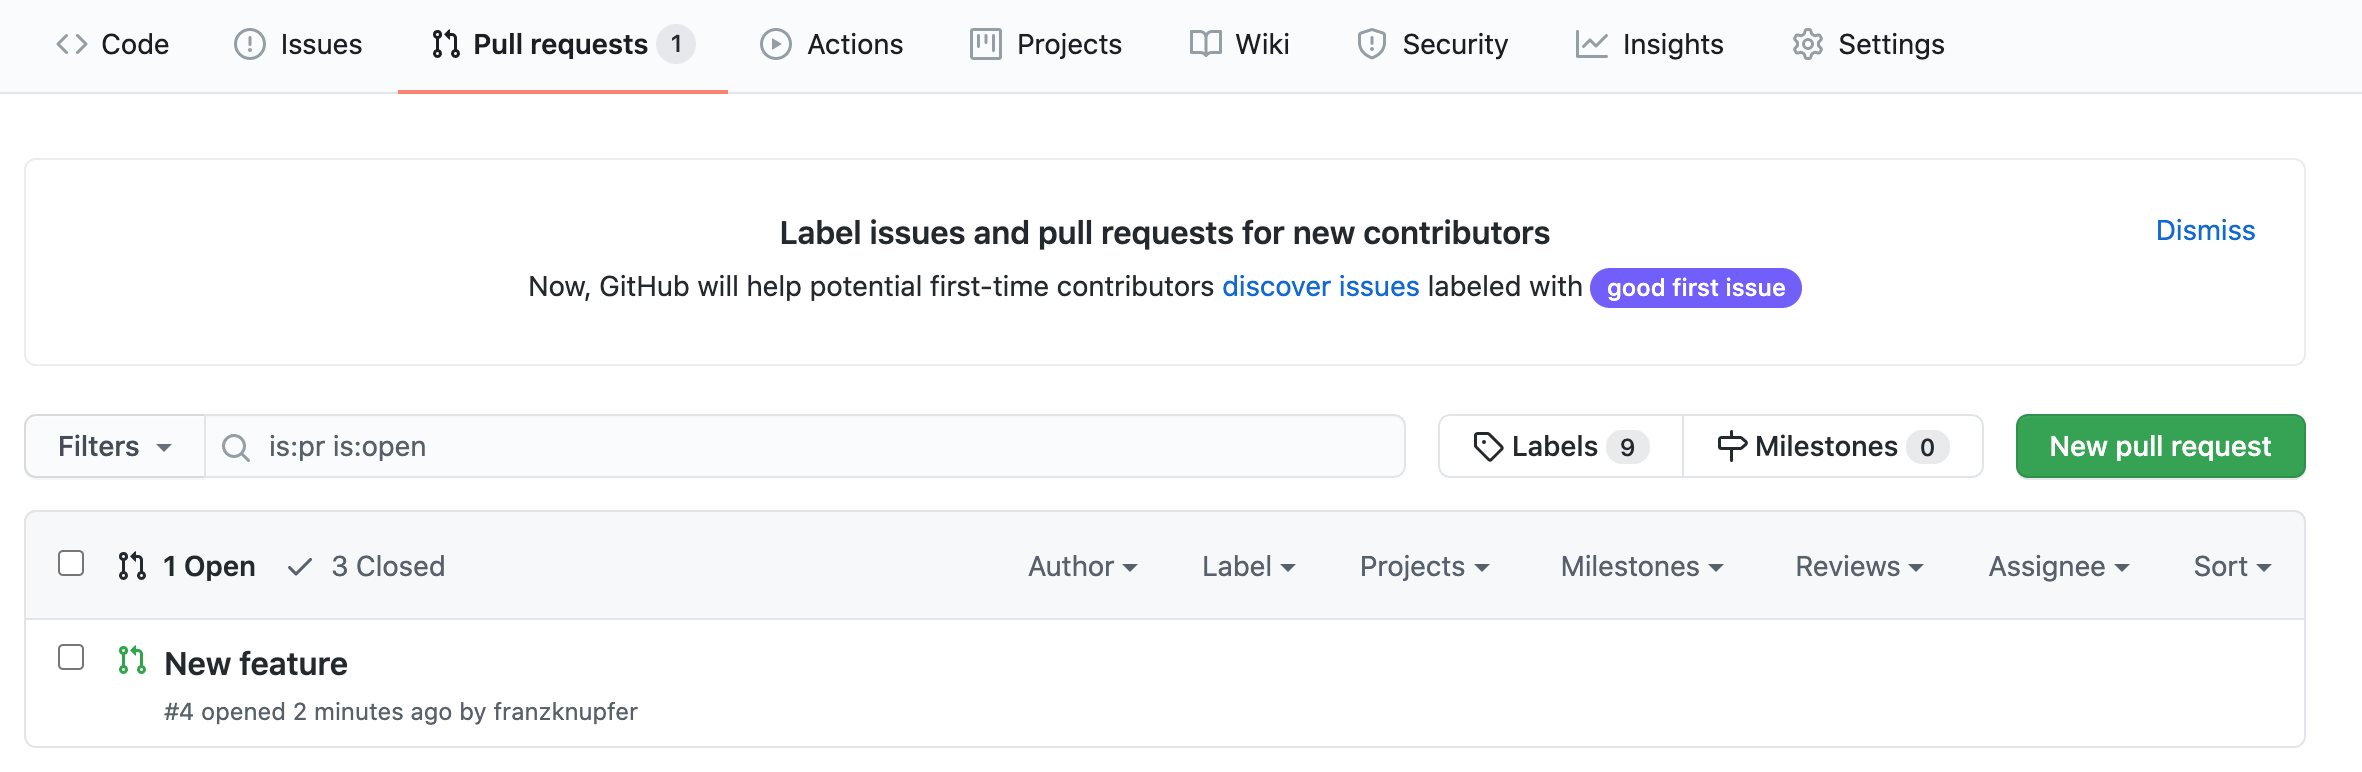
As we can see in the image above, the New feature title isn't so great — it's fine for practice, but if we had many pull requests, the purpose of this one wouldn't be clear.
The image below shows the page for the PR itself:
There are several important things to note about the PR page:
The PR will show a list of commits. If we need to, we can click on any of the commits to review the code. This is one thing a senior dev would do before approving the PR. (Note that the image above doesn't show the list of commits but you'll see it in your own UI.)
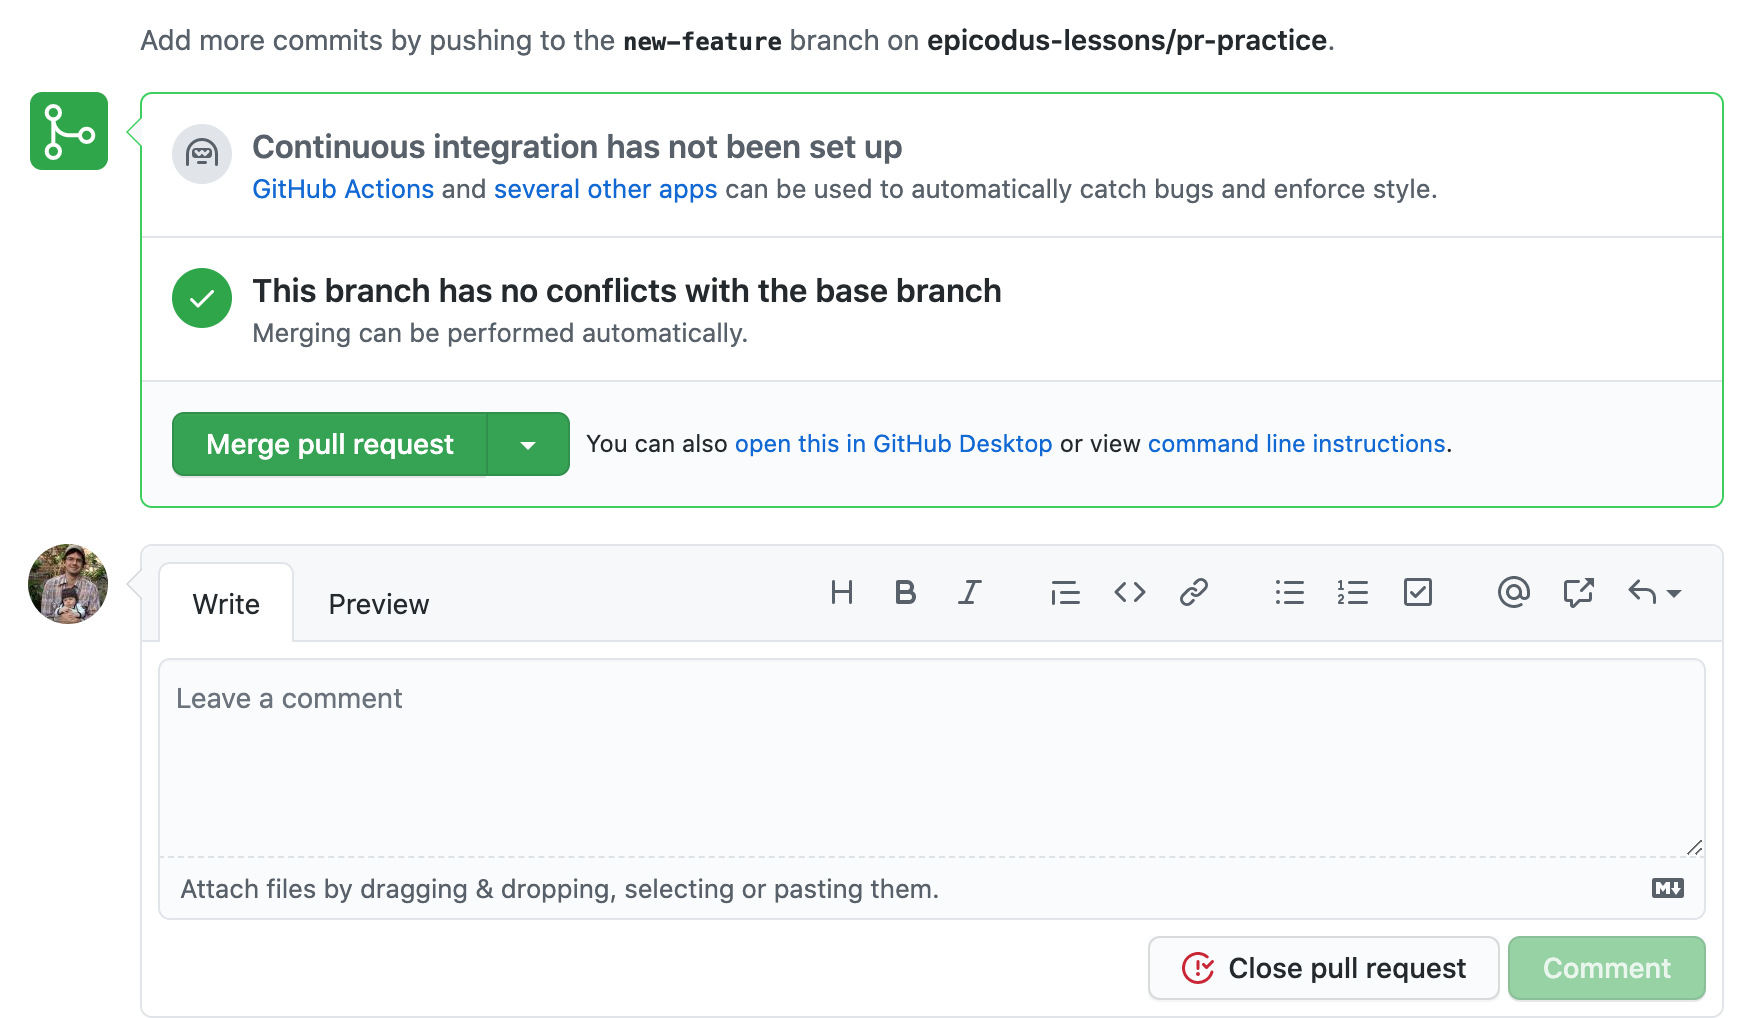
As the image above shows, This branch has no conflicts with the base branch. We already know that. The good news here is that we can easily merge without running into conflicts.
The green button gives us the option to Merge pull request. You can also click on the dropdown by this button to choose to Squash and merge or Rebase and merge. Generally, we will just click Merge pull request. The advantage of Squash and merge is that it will take all the commits from the PR and squash it down into one commit. This makes the commit history on our main branch tidier. For instance, if we added a navbar, we could Squash and merge to a single commit that reads
complete navbar feature. Finally, Rebase and merge means that we can reorganize and rewrite all the commits. However, rebasing should be avoided unless it's necessary due to a poor commit history.
At the bottom of the page, we can leave a comment. There's also a Close pull request button (if you have privileges to close pull requests, which you will in your own account). We'd only click the Close pull request button if we want to reject it.
The comments are a great place to discuss the PR, including any changes or updates that should be made to it. Try adding a message for practice.
Now let's click on the Merge pull request button to actually merge the pull request. We can name this commit whatever we want and then click Confirm merge.
Once the branch is merged, we'll be given the option to delete it by clicking on the Delete Branch button.

Generally, once a feature is complete, the branch should be deleted. Then a new branch should be created for new features. For that reason, it's a good idea to delete the branch so it doesn't clutter the GitHub repository. The branch will still be available locally (unless it is deleted there, too).
If we were to continue working on that branch locally, we could still make a new PR with that branch later. That's actually what we'll do with our second PR — no need to create a new branch when we are focused on making and accepting pull requests in this lesson.
Our first PR is complete! We've learned how to make a PR and approve it.
Dealing with Merge Conflicts
Let's create one more PR. This time around, we'll intentionally introduce a merge conflict. That way, we can practice resolving a merge conflict in the GitHub UI. While we want to avoid merge conflicts if possible, they will happen from time to time, and you should be prepared when it does.
First, we need to introduce a merge conflict in our code. We'll start by making an update to the README in the GitHub UI. Click on the pencil icon by the README in GitHub and update the final line of the README to the following:
New feature updated...
Commit this code in GitHub.
Next, we'll make a change in the new-feature branch locally. We'll update the final line to this:
New feature changed...
It's a fairly similar line of text, but just different enough to create a merge conflict.
Save and commit this code. Next, push the branch to GitHub:
$ git push origin new-feature
Our new-feature branch will be in direct conflict with the main branch — a great opportunity to practice resolving a conflict!
Go to the Branches tab of the repository in GitHub and click on the New Pull Request button to the right of the new-feature branch. (In general, all of the steps involved in creating a PR will be the same as they were for our first PR.)
Now, when we're taken to the page to make a PR, we'll see a message that states we can't automatically merge.

In our own projects, we should definitely heed this message if we weren't expecting a merge conflict. Generally, this means that two different teams have been working on the same code in different ways, which is a likely sign of a communication breakdown.
Go ahead and submit the PR following the same steps as stated for our first PR. The only difference in this entire process is the message that states that we can't automatically merge the PR. If you need assistance, review the steps from when we created our first PR in the previous section of this lesson.
Now we're ready to merge our PR. If you haven't already, navigate to the PR in GitHub. Instead of the green Merge pull request button, we'll see a new message:
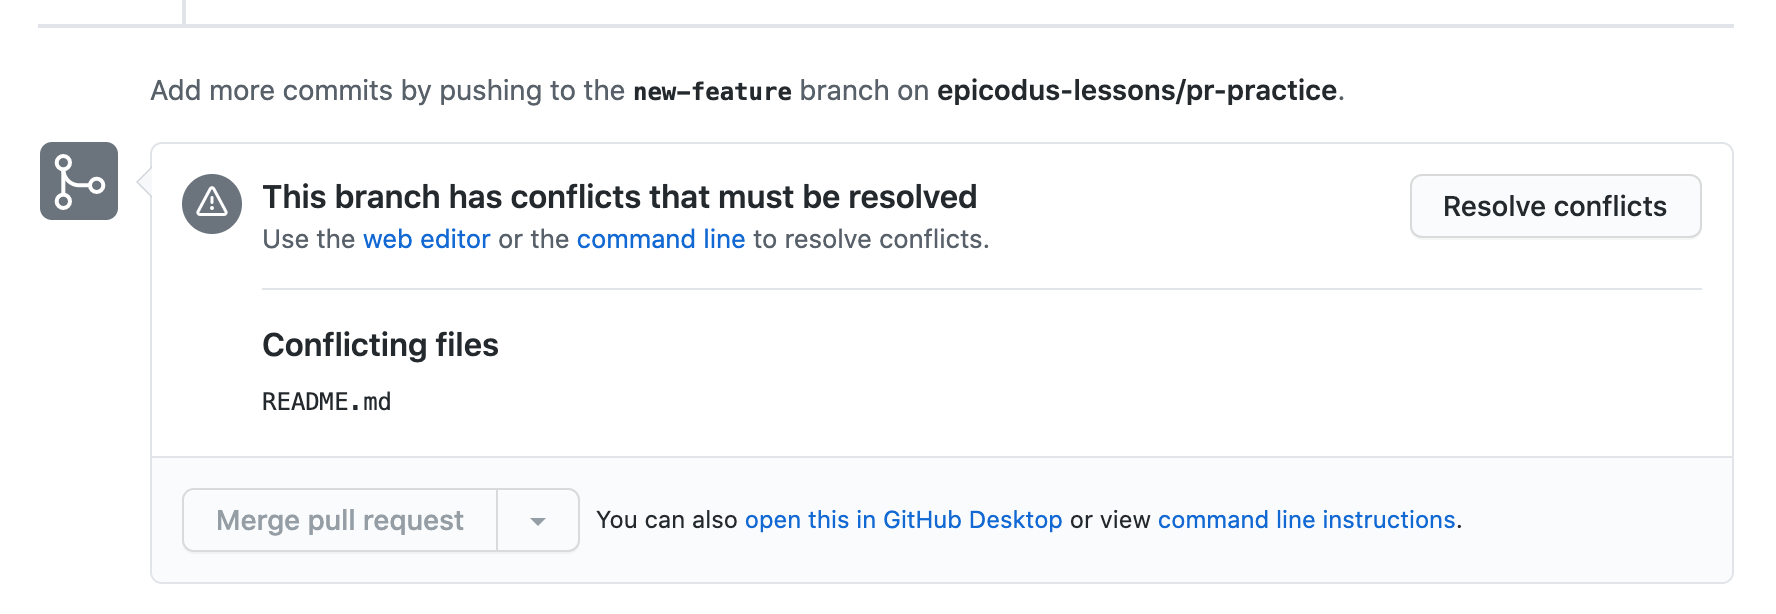
The message reads This branch has conflicts that must be resolved. We can click the button to the right of this message to Resolve conflicts. Click that button now. The GitHub UI will allow us to resolve the merge conflicts.

In this example, there is only one file with a merge conflict. However, if there are multiple files that have merge conflicts, we'll see the name of each file in the left-hand pane. At the top right hand corner of the pane, we'll see a greyed-out Mark as resolved button. We cannot click this button until we remove all lines that indicate where the conflicts are. These lines will always include =======, <<<<<<<, and >>>>>>>.
To the left of the Mark as resolved button, we'll see a message in red that says 1 conflict — and then just to the right of that we'll see we can click Prev and Next. This is so we can navigate between files with conflicts. We can't do that here because we only have one conflict to resolve.
Fixing the issue itself is a bit more involved than doing so in VS Code. In VS Code, we can click whether we want the current, incoming, or both changes to take effect. In the GitHub UI, we have to modify the code manually.
The code below <<<<<<< is the incoming change from the new-feature branch. The code below >>>>>>> is the current change from the main branch. If the arrows mix you up, just focus on the names of the branches instead and keep in mind that the code in the branch you choose will take precedence.
This is how the code currently looks with GitHub's merge messages inserted:
<<<<<<< new-feature
New feature changed...
=======
New feature updated...
>>>>>>>
Assuming that we want to accept the code from the new-feature (since that's the point of the PR), we'd remove <<<<<<< new-feature and then also remove:
=======
New feature updated...
>>>>>>>
That would leave just:
New feature changed...
Alternatively, we can modify the code in other ways as well as long as the GH merge conflict messages are removed. Once again, those are all the lines with =======, <<<<<<<, and >>>>>>>.
When the merge conflict lines are removed, the Mark as resolved button will no longer be greyed-out and we can click it. This is a nice little feature to ensure we don't accidentally leave any of those lines in our code.
Once our merge conflict is marked as resolved, we'll see some changes in the UI.

Most importantly, we can now click Commit merge. When we click on this button, we'll be able to make a new commit (as always, with a clear, concise commit message) that commits the changes we just made to resolve the conflict. At this point, we've just made a new commit, but we still haven't merged the PR yet! Now that the conflict is resolved, we'll see the green Merge pull request button. We can click that button and finish merging the PR.
In this lesson, we made and merged two simple pull requests, including one with a merge conflict. We recommend practicing this workflow as you work on your group project — and give your project teammates the chance to look at your pull requests, make comments, and then approve them!